Glossary
Astrophotography is a big subject and involves a lot of obscure terminology. In order to help you to understand what we're talking about we've attempted to write a glossary of common terms and equipment, how they're used and their effect on the final image.
AP
Astrophotography! It's what we do here.
Aperture
The aperture is the diameter of the opening at the front of the telescope, where light enters. In astrophotography the aperture is fixed.
Autoguider
An autoguider is a small camera, usually attached to a small telescope on top of the imaging telescope. The autoguider plugs into the mount and your computer and monitors a star. If that star moves in the autoguider's field of view it will send a command to the mount to recenter the star. This helps to increase imaging time as guiding can overcome slight polar alignment errors and minimize any drift caused by periodic error. Autoguider Wiki page
Barlow lens
A barlow lens can be placed between a planetary camera and the telescope. Barlows magnify the image by the number of times listed on the barlow - for example a 2x barlow will produced an image that is twice as large. Barlows only tend to be used for planetary and lunar astrophotography.
CCD
A CCD is an advanced type of camera used for astrophotography. They often have more sensitive sensors than DSLRs and employ cooling to reduce noise. Most are monochrome allowing for narrowband imaging which allows capture of specific emission wavelengths from the target.
Chromatic Aberration
In non-apochromatic refractors the light is focused to slightly different points. This can cause colour fringing around stars and planets. Here's a picture of Jupiter with very severe chromatic aberration
Collimation
Collimation is the alignment of the mirrors in your telescope. It's seen on reflecting telescopes, i.e. newtonians and schmidt-cassegrains. Miscollimation can result in fuzzy planetary images, distortion in your images and an uneven field. There are many guides out there on how to collimate, newtonians can be collimated using a cheshire eyepiece or laser collimator, schmidt-cassegrains can be collimated using a duncan mask or star test.
Color Zone
In posts a lot of people refer to their location as a "red zone" or a "blue zone". This refers to the Bortle zone which is a measurement of light pollution. A more in-depth look at light pollution and its effects on your images can be found here
Coma
Coma is usually an affliction of the reflecting telescope. It's caused by the shape of the mirror, which causes the light to be focused slightly differenly toward the edges of the image. This results in little comet-shaped stars around the edges. An example of uncorrected and corrected coma can be seen in this image
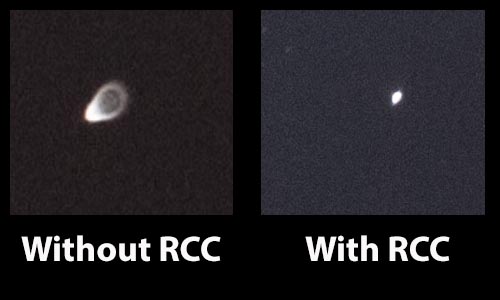
Dark/Flat/Bias frames
Also known as calibration frames, darks and bias frames are used to reduce electronic noise from the camera and flat frames are used to remove vignettes and dust spots from the telescope. A more in-depth explanation can be found at the DSO stacking page.
DSOs
Deep space objects and stuff outside of our solar system, i.e. galaxies, nebulae and star clusters.
Field of view
The field of view (or FoV) of a telescope is how much sky we can fit onto the camera sensor. It is different depending on both the camera's sensor and the telescope's focal length. A handy tool for calculating your field of view can be found here.
Field Flattener
Some refracting telescopes suffer from distortion toward the edges of the field of view, similar to a fisheye lens though not as pronounced. This can be corrected with a field flattener which slightly changes the way the light travels at the edges of an image. An example of an un-flat field can be found here, notice how the stars toward the corners and edges seem to stretch inward slightly.
Field rotation
Field rotation is an imaging problem most commonly found in alt-azimuth mounts and essentially makes them impossible to use for long exposure astrophotography. If you open up a planetarium program such as Stellarium and turn the speed up you'll notice that as the targets move across the sky they appear to 'rotate' in relation to your position on earth - for example a constellation rising in the east will be upside-down by the time it sets in the west. Equatorial mounts counter this due to their tracking method following the earth's rotation, alt-azimuth mounts can't as they aren't polar aligned and are tracking on two axes. This causes the stars in your image to rotate around the center of the frame.
Focal length
Focal length is the distance from the primary mirror or lens of the telescope to the focal point (in this case the camera's sensor). A longer focal length makes for a smaller field of view and a more zoomed in image.
Focal ratio
The focal ratio is how large the aperture is in relation to the focal length. A fast focal ratio (e.g. F/4) results in images taking less time to expose than a slow focal ratio (e.g. F/10). The focal ratio is worked out by dividing the focal length by the aperture - an 800mm focal length 200mm aperture newtonian will be f/4. Something which is also related to focal ratio is F/stops. This is a list of focal ratios in increments of how long they take to expose - the next F/stop takes twice as long of an exposure to produce the same level of detail.
| F/stop | 2.8 | 4 | 5.6 | 8 | 11 | 16 | 22 |
|---|---|---|---|---|---|---|---|
| Exposure time | 10s | 20s | 40s | 80s | 160s | 320s | 640s |
In imaging deep sky objects a fast focal ratio is desirable. For planetary imaging it is not as important.
Gain
Gain is a similar concept to ISO, increasing the sensitivity of the camera chip. Increasing gain can result in increased noise. Gain is the conversion of photons hitting the sensor to the digital readout, so for example at a high gain it would take more electrons hitting a pixel to activate it than at a low gain.
Guiding
Guiding is the task performed by an autoguider in order to correct for deviations in the mount's tracking ability. Images shot without an autoguider rely on the mount's tracking - thereby relying on polar alignment and gear accuracy - and are referred to as "unguided". Unguided images will be more limited in exposure time.
Guided vs Tracked
Saying a shot is guided implies tracking. Tracking is when the mount a telescope is on is motorized. Guiding is when that tracking is supplemented by an Autoguider.
ISO
ISO equates to the sensitivity of film which was used prior to digital cameras. In modern DSLRs the same number of photons is collected regardless of the ISO, but these are converted into pixels at higher or lower rates dependent on it. ISO settings, while amplifying signal, also amplify noise, resulting at higher noise at higher ISOs. There is a point at which the tradeoff between noise and signal amplification is no longer advantageous, this is often referred to as "unity gain". Some people enjoy nitpicking over how unity gain isn't a real thing in DSLRs, but it still remains a valuable analogy. The ideal ISO for many cameras is usually around 800 but varies, especially with newer models.
Light pollution
Light pollution is the light that comes from towns and cities. It turns the sky a lovely shade of orange and can reduce contrast in deep sky objects. It's better for this reason to image in a site far away from towns, or to use a light pollution filter if such a site is unavailable to you.
NCP
North Celestial Pole. This is along the axis on which the earth rotates - if you take a long exposure photograph of the NCP stars will appear to make concentric circles as is often seen in star trail images.
OTA
OTA stands for Optical Tube Assembly. It's a shorter way of saying "telescope".
Periodic error
Mass produced mounts drive the tracking axis through ring gears - mass produced as they are these often have slight imperfections which can cause the telescope to move while tracking. It's called periodic error because it encompasses one period (or revolution) of the ring gear. Periodic error can usually be guided out. The advanced user may benefit from hypertuning their mount.
Pinched optics
Sometimes stresses are put on the mirrors or lenses of the telescope by maladjusted screws and retainers. Disassembling a telescope is not for beginners, if you think your telescope has pinched optics take it to a shop to get it repaired. Here's an example of a Newtonian displaying severe pinched optics due to an improperly installed secondary mirror.
PA
PA is the abbreviation we use for polar alignment.
Polar alignment
In equatorial mounts (the type you should be using for deep sky) the tracking axis (right ascension) must be aligned with the polar axis of the earth. If you think about how the earth rotates and gives the stars the appearance of movement the equatorial mount moves at the same rate in the opposite direction, cancelling out the movement. It's important that the axes are exactly aligned so the tracking is dead on. If the polar alignment is not correct it can cause trailing of the stars in your image and eventually the target will drift out of the field of view. If you'd like to know more about how to do a polar alignment read the full article here.
Reducer
A reducer is similar to a barlow, but works the opposite way. It decreases your focal length and therefore your focal ratio, for example turning your slow f/10 schmidt-cassegrain into a faster f/6.3 imaging system. You can get a reducer for just about any telescope and many of them have field flatteners built in, so if you have a long focal length refractor they are an ideal accessory.
Seeing
Seeing is an important value for planetary imaging. When there is poor seeing this means that there is high atmospheric turbulence which causes your video to wobble or appear under water as currents of air disturb the light entering your camera. This kills detail in planetary work. Seeing isn't really something we can change - we just have to wait for a night with good seeing or try to find an area with less atmospheric turbulence.
Stacking
The definition of stacking depends on whether you're doing it to planetary or deep sky images. The basic goal is to improve the signal-to-noise ratio, allowing for an image that responds better to post-processing. Read the deep sky stacking guide here and the planetary stacking guide here
Star trailing formula
When doing wide-angle with a fixed tripod the stars will move and trail based on your focal length and sensor size. The optimal exposure time can be calculated using this exposure calculator
Tracking
Tracking refers to a motorized mount which follows the object of interest. There are three important tracking rates - Sidereal, Solar and Lunar, and each are suitable for different types of targets. Sidereal follows the motion of the stars, Solar the planets and Lunar the moon. Tracking is very important for photographing DSOs and can be improved by guiding or 3rd party services such as Hypertuning. Tracking is not so important for planets but is still very helpful at high magnification.
Untracked
Untracked images are those taken without a motorized mount such as a simple DSLR on a tripod, or a planetary photo taken through a non-motorized telescope. These are limited by the focal length of the instrument, see the star trailing formula above for how long you can expose before noticing star movement.